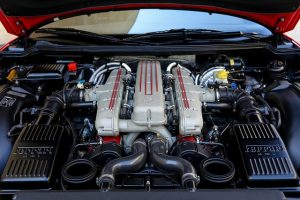
A clean engine allows more efficient cooling, protects engine parts from wearing out and lets you see the levels of your car fluids easily since markings won’t be covered in grime. However, the engine bay is one of the most overlooked parts of the car when cleaning. Some car owners may have the notion that since the engine parts are protected by the hood, they won’t need cleaning as often. Most of the time, car owners avoid cleaning their car’s engine because they just don’t know how. This step-by-step guide will teach you how to clean your engine bay yourself.
How to clean your engine bay: Notes and precautions
- Do not detail your engine while it’s still hot. Spraying water on a hot engine can break it. If it is still at its operating temperature, open the hood and let it cool for a while. You may start cleaning when it’s not too hot, but still warm enough to loosen up dirt and grease.
- Clean your engine on a warm day so that water that goes into engine parts that are meant to be kept dry can evaporate quickly.
- Collect wastewater while cleaning and make sure to dispose of it properly.
How to clean your engine bay: Supplies you will need
Prepare the things you need beforehand. Check out product reviews to decide which brand and variant of car detailing products to buy.
- Hose with nozzle attachment or pressure washer
- Degreaser
- Plastic wrap
- Automotive masking tape
- Aluminum foil
- Brush
- Protectant and applicator
- Cloth or towel for cleaning/drying
Prep your car
You have to protect the electrical components of your engine. Remove the battery cables starting with the negative port to avoid having a short circuit. You may remove the positive cable after the circuit has been broken. Set the cables aside. Cover major electrical parts (i.e. alternator, air intake systems, electrical plugs) with plastic or aluminum foil and secure with tape.
Step 1: Initial rinse
Spray water all over the engine to get rid of loose dirt. Maintain a low pressure of the water stream as high pressure would force water into small crevices. Doing this also dilutes the degreaser and helps spread it more evenly, avoiding spotting that causes stains.
Step 2: Apply degreaser
Dilute degreaser if necessary (depending on formulation). Spray it all over the engine and the flipped-up hood. Let it stand for at least 1-2 minutes.
Step 3: Scrub grimy areas
Use different types of brushes to clean engine parts depending on its material – aluminum/wire brush can be used for metal parts and a nylon brush for softer materials like plastic or rubber. Clean all surfaces including nooks, crannies, valve covers, etc. Do not let the degreaser dry out while cleaning.
Step 4: Rinse
After cleaning, rinse the engine with a low-pressure stream of water. Wash off all the dirt and grease that came out of scrubbing. Be careful not to force water into nooks and crannies where it won’t dry out easily. Start spraying from the back to the front while keeping the spray moving to avoid exposing an area to water too long.
Step 5: Repeat Steps 3 and 4 if necessary
After rinsing, you may find that you’ve missed scrubbing some areas. Spot clean these places and rinse afterward.
Step 6: Air dry engine
The engine needs to be completely dry after detailing to avoid the corrosion of metal parts and the possibility of water seeping into the electrical components. Drying can be done manually using a towel or with an air dryer. Do not use too much pressure with the air dryer as it will push water deeper into the engine crevices. You need to get water out of the engine and not in. When the engine is relatively dry, you can remove all the plastic bags and foil you used to cover the electrical parts and turn the engine on. The operating temperature of the engine together with the radiator fans will help dry the engine more.
Step 7: Apply protector to all plastic, vinyl and rubber surfaces
The protector will make these surfaces look like new and will serve as a shield from harmful elements. When applying the protector, avoid the areas containg the mechanical pieces such as moving fans or belts.
Post-cleaning
Make it a habit to check for leaks (i.e. oil leaks, coolant leaks) after detailing. If your engine is extra greasy, it may be caused by an oil leak. Trace dyes with UV light are useful to pinpoint the source of the leak.
Cleaning your car’s engine bay is easier than you think it is, especially with all the quality detailing products available. Do it regularly every 3 to 6 months. If you do not have time, you can always opt to have professionals do it for you. Check out services offered at DetailXPerts today.